¶ ARCOS-Lab Cognitive Architecture
This project consist of our latest (2021) cognitive architecture.
In this wiki we will describe some of the released parts of the architecture. How they work and how to install them.
A more theoretical explanation will be included in the future,
¶ Theory
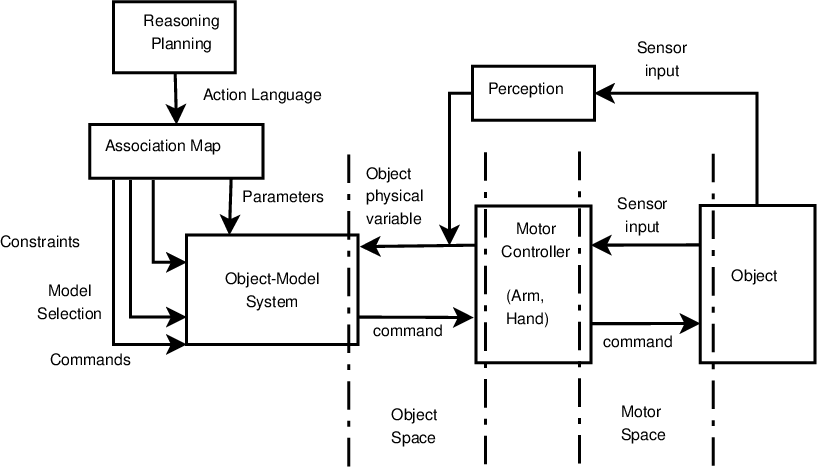
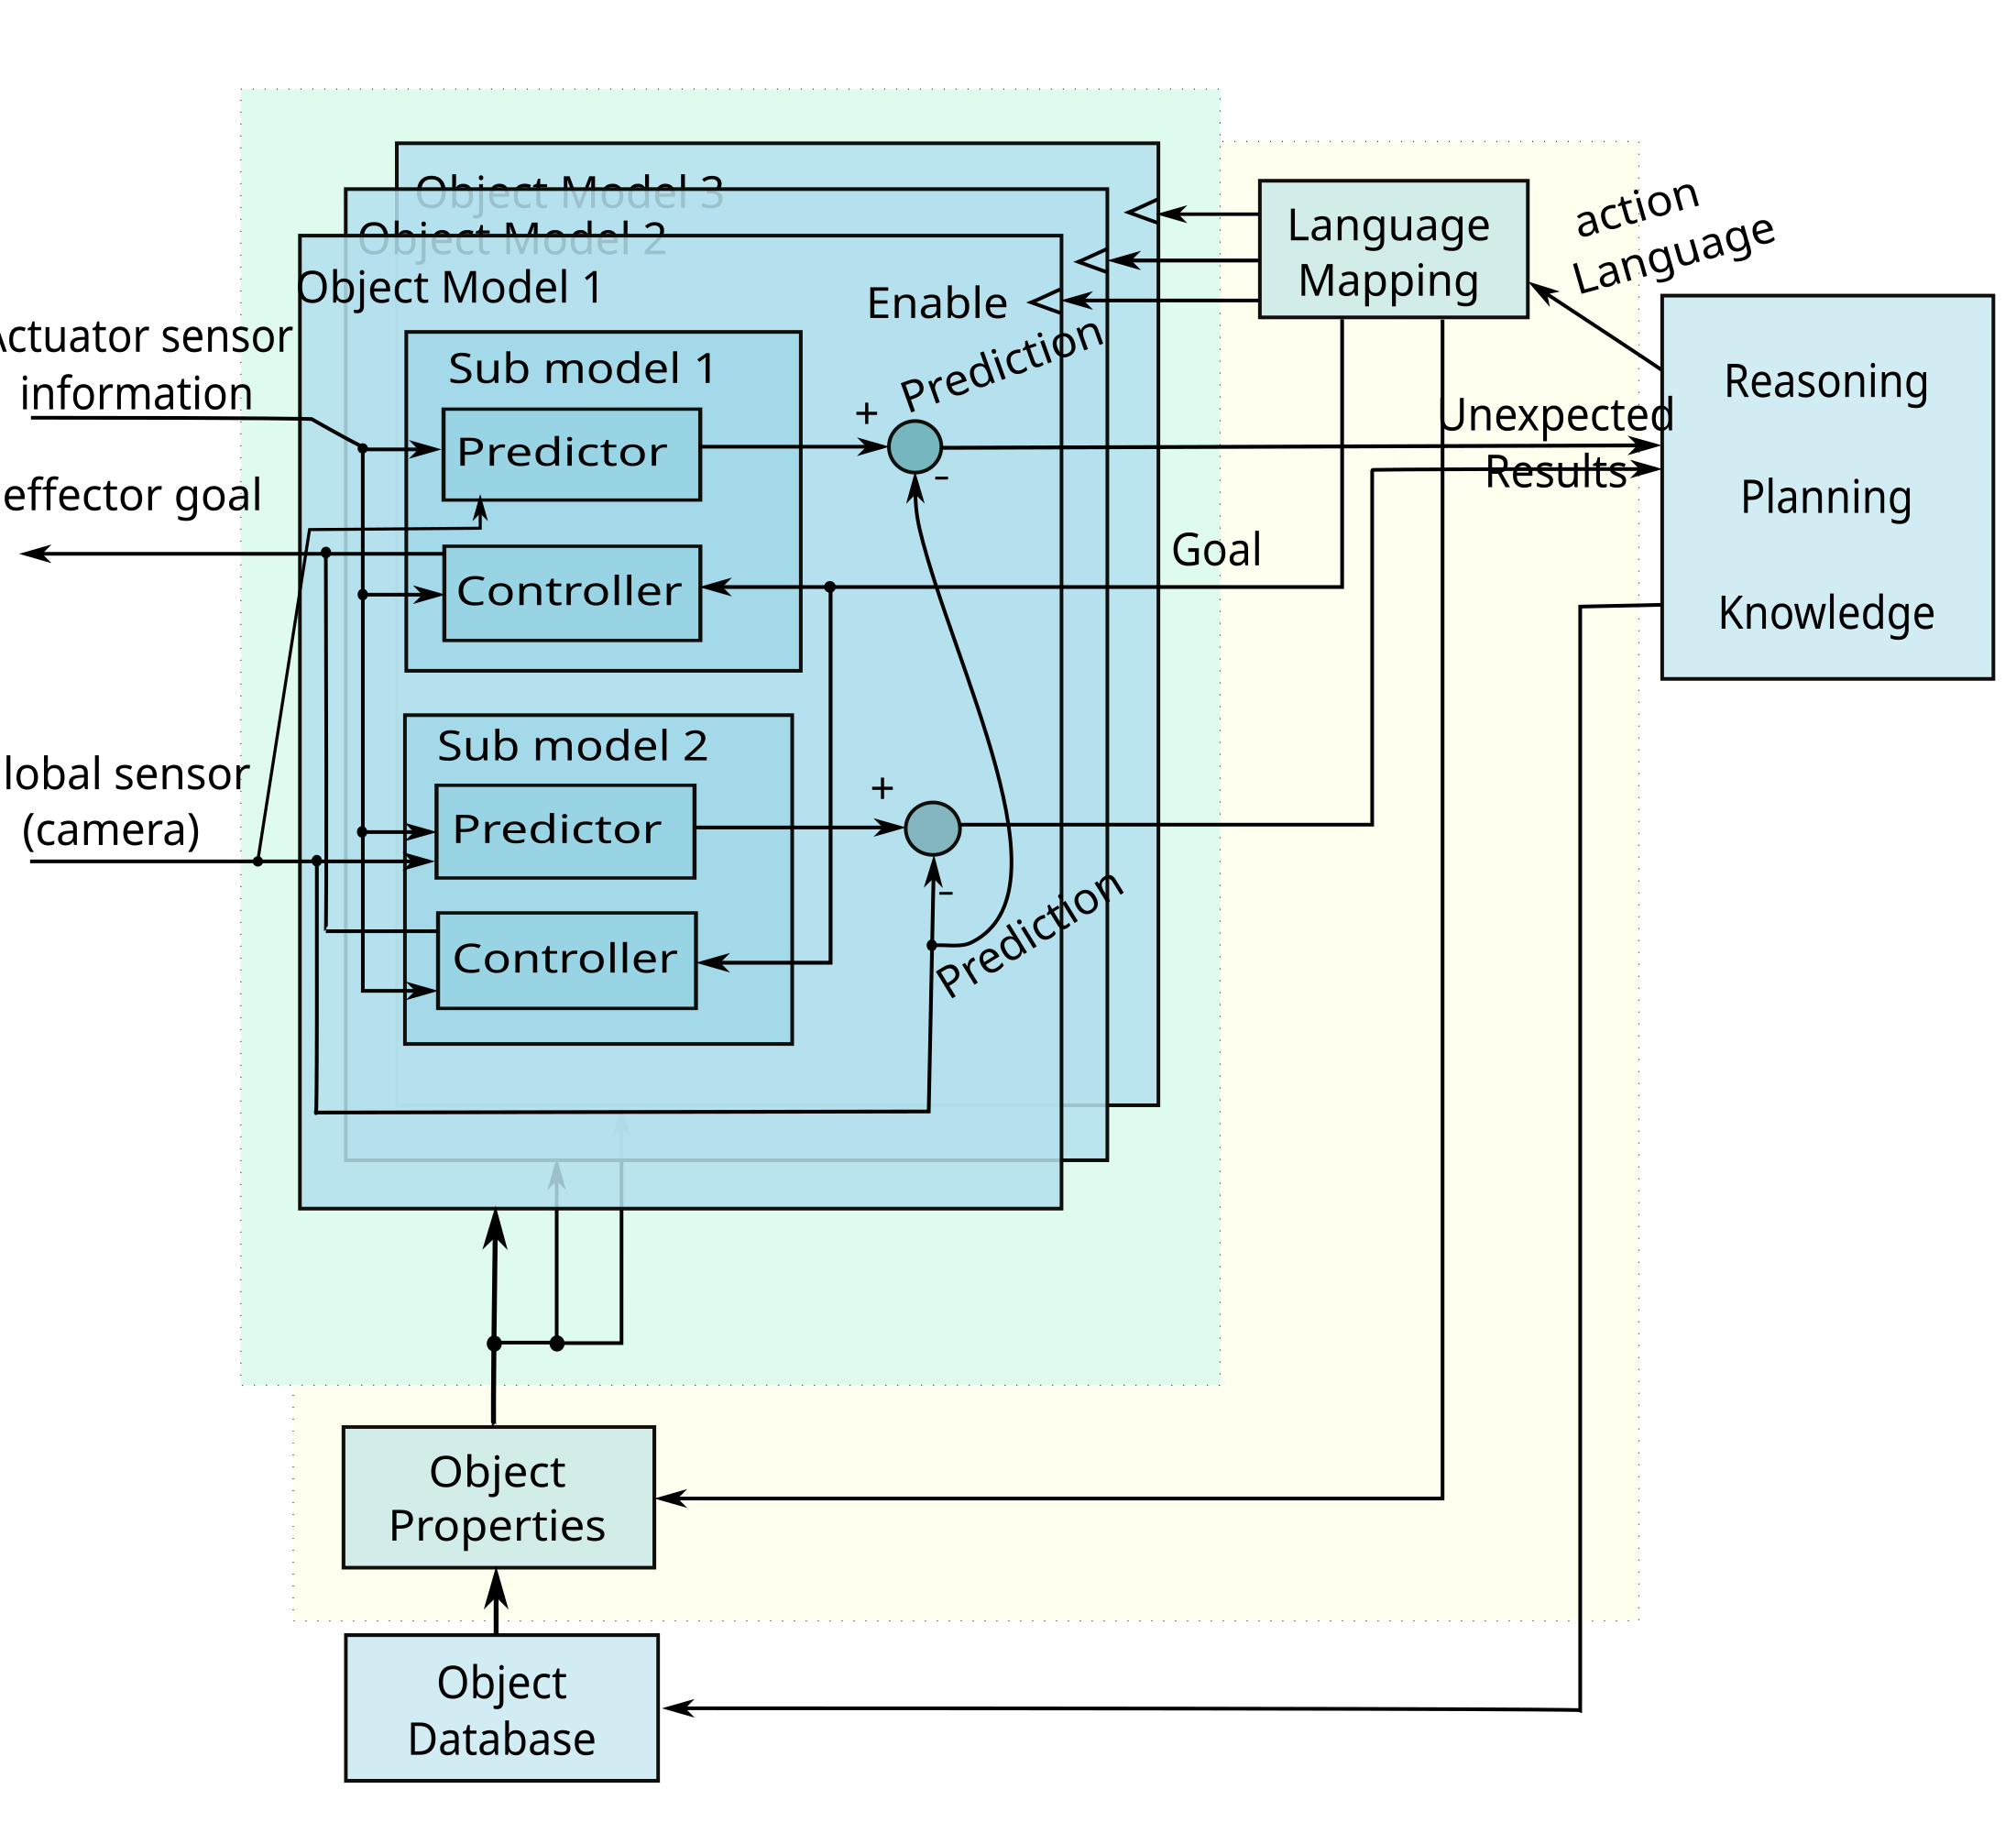


¶ Levels of the architecture
The system consists of the following main subsystems:
- Lower Layer (L1/L2) (Robot Body Coupler)
- Middle Layer
- High Level Layer
- Knowledge System
- Object Model System (OMS)
¶ Installation Instructions for a simulated robot
This tutorial focuses mainly on the ARCOS-Lab humanoid Robot. If you want to use its pet (Assimilar) follow this tutorial: ARCOS-Lab Cognitive Architecture for Asimilar Robot
¶ Requirements:
- Install Ubuntu Jammy
- Be sure to have at least x GB of free space
- Try to use an SSD drive (faster development)
¶ Steps
- Add all ubuntu repositories:
sudo apt-get install software-properties-common python3-venv
sudo add-apt-repository universe
sudo add-apt-repository multiverse
sudo add-apt-repository restricted
sudo apt update
sudo apt upgrade
-
Install ROS2 (Desktop installation (RVIZ must work)) with this tutorial
-
Create a local python virtual python environemnt for local python package installations
mkdir ~/wsr2
cd ~/wsr2
# We need to allow system packages to find ROS packages
python3 -m venv --system-site-packages venv
cd ~/wsr2/venv
source bin/activate
We will need some (mostly python) dependencies:
sudo apt install python3-colcon-cd python3-colcon-ros python3-colcon-common-extensions
sudo apt install python-is-python3 ipython3 python3-pip git ros-humble-xacro ros-humble-ruckig libeigen3-dev
sudo apt install python3-vcstool
# These are system packages so that they are compatible with ROS humble packages
sudo apt install python3-numpy python3-scipy python3-pykdl
source ~/wsr2/venv/bin/activate
# pip and setuptools must be somewhat updated and setuptools must be older than 80 for ruckig to install
pip install --upgrade pip setuptools
pip install "setuptools<80"
pip install --upgrade packaging
pip install --upgrade coverage
pip install ruckig gtts librosa pydub tornado simplejpeg pydbus pycairo PyGObject
# Newer versions of quaternionic use numpy 2.0.0 which is not backward compatible
pip install quaternionic==1.0.5
- Add a COLCON_IGNORE in the venv.
cd ~/wsr2/venv
touch COLCON_IGNORE
- Create a file named ros2_setup.sh in your home with the following content:
source ~/wsr2/venv/bin/activate
# This variable will allow ROS to find your local virtual environment
export PYTHONPATH=$HOME/wsr2/venv/lib/python3.10/site-packages
source /opt/ros/humble/setup.bash
source ~/wsr2/install/setup.bash
source /usr/share/colcon_cd/function/colcon_cd.sh
export _colcon_cd_root=~/ros2_install
# export ROS_DOMAIN_ID=0
- Initialize the workspace:
mkdir -p ~/wsr2/src
cd ~/wsr2/
colcon build
- Install python_robot_misc_utils. THis package contains many utilities that are used in other packages of our lab.
mkdir -p ~/wsr2/venv/src/
cd ~/wsr2/venv/src
git clone git@gitlab.com:arcoslab/python_robot_misc_utils.git || git clone https://gitlab.com/arcoslab/python_robot_misc_utils.git
cd python_robot_misc_utils
pip install .
- Install the generic multi joint impedance control virtual robot package (remember to source ros2_setup.sh before):
mkdir -p ~/wsr2/src
cd ~/wsr2/src
git clone git@gitlab.com:arcoslab/arcos-lab-cognitive-architecture/ros2-generic-multi-joint-impedance-control-virtual-robot.git || git clone https://gitlab.com/arcoslab/arcos-lab-cognitive-architecture/ros2-generic-multi-joint-impedance-control-virtual-robot.git
- Install the Mobile platform repository (for the URDFs):
mkdir -p ~/wsr2/src
cd ~/wsr2/src
git clone git@gitlab.com:arcoslab/robot-hardware-firmware/arcos-lab-mobile-platform.git || https://gitlab.com/arcoslab/robot-hardware-firmware/arcos-lab-mobile-platform.git
- Install the Kuka robot repository (for the URDFs):
mkdir -p ~/wsr2/src
cd ~/wsr2/src
git clone git@gitlab.com:arcoslab/robot-hardware-firmware/kuka-lwr4plus.git || https://gitlab.com/arcoslab/robot-hardware-firmware/kuka-lwr4plus.git
touch kuka-lwr4plus/kuka_lwr4plus_robot/COLCON_IGNORE
- Install the Wessling hands repository (for the URDFs):
mkdir -p ~/wsr2/src
cd ~/wsr2/src
git clone -b ros2_humble https://gitlab.com/open-wessling-drivers/wessling_hand_driver.git
touch wessling_hand_driver/wessling_hand_driver/COLCON_IGNORE
- Install Panda repository (necessary for a Panda message):
mkdir -p ~/wsr2/src
cd ~/wsr2/src
git clone git@gitlab.com:arcoslab/robot-hardware-firmware/drivers/ros2-panda-driver-topics.git
touch ros2-panda-driver-topics/ros2_panda_driver_gripper_sim/COLCON_IGNORE
touch ros2-panda-driver-topics/ros2_panda_driver_topics/COLCON_IGNORE
- Install RBC package:
mkdir -p ~/wsr2/src
cd ~/wsr2/src
git clone git@gitlab.com:arcoslab/arcos-lab-cognitive-architecture/robot-body-coupler/robot-body-coupler.git
cd
source ros2_setup.sh
cd ~/wsr2
colcon build --packages-select rbc_msgs_srvs
cd
source ros2_setup.sh
cd ~/wsr2
colcon build
- Install RBC client examples package:
mkdir -p ~/wsr2/src
cd ~/wsr2/src
git clone git@gitlab.com:arcoslab/arcos-lab-cognitive-architecture/robot-body-coupler/robot-body-coupler-client-examples.git
cd
source ros2_setup.sh
cd ~/wsr2
colcon build
- Install the ARCOS-Lab humanoid robot startup package:
mkdir -p ~/wsr2/src
cd ~/wsr2/src
git clone git@gitlab.com:arcoslab/arcos-lab-cognitive-architecture/arcos-lab-humanoid-startup.git
cd
source ros2_setup.sh
cd ~/wsr2
colcon build
- Install the ARCOS-Lab humanoid voice package:
cd ~/wsr2/src
git clone git@gitlab.com:arcoslab/arcos-lab-cognitive-architecture/robot-emotions/arcos-lab-humanoid-voice.git
cd ~/wsr2
colcon build
¶ Running the whole system in simulation:
Note: For each console remember to source your environment:
source ros2_setup.sh
¶ Instructions (for simulation):
We have a launchfile for the entire robot, it will start the following:
- Node for Neck simulation
- Node for each kuka simulated arm
- Node for the hands
- Node for the mobile platform
- Node for robot descriptions and TF
- Rviz with a particular configuration
- Robot body Coupler (RBC)
Note that this will launch the robot inside the
sim_humanoid_01namespace. This means that everything, includng Rviz, TF, and the particular nodes will be running under that namespace.
ros2 launch arcos_lab_humanoid_startup arcos-lab-humanoid-startup-sim_humanoid_01.launch.py
¶ Using Robot Body Coupler as a client
There is a python client class for managing reachers and extenders from your own ROS2 program (RBC client). It is called Reacher/Extender Executor2.
For more information for writing your own RBC client follow the next link:
Robot Body Coupler Reacher/Extender Executor2
¶ Older Robot Body Coupler client examples
These are older RBC client examples that communicate with the RBC server directly using ROS2 actions, services, topics and ROS params.
It is no longer recommended to use these examples since managing ROS2 actions and services directly is quite complicated/unclean and it doesn't scale easily for multiple RBC reachers/extenders.
Older Robot Body Coupler client examples
¶ Developing newer reachers and extenders into the RBC (TODO)
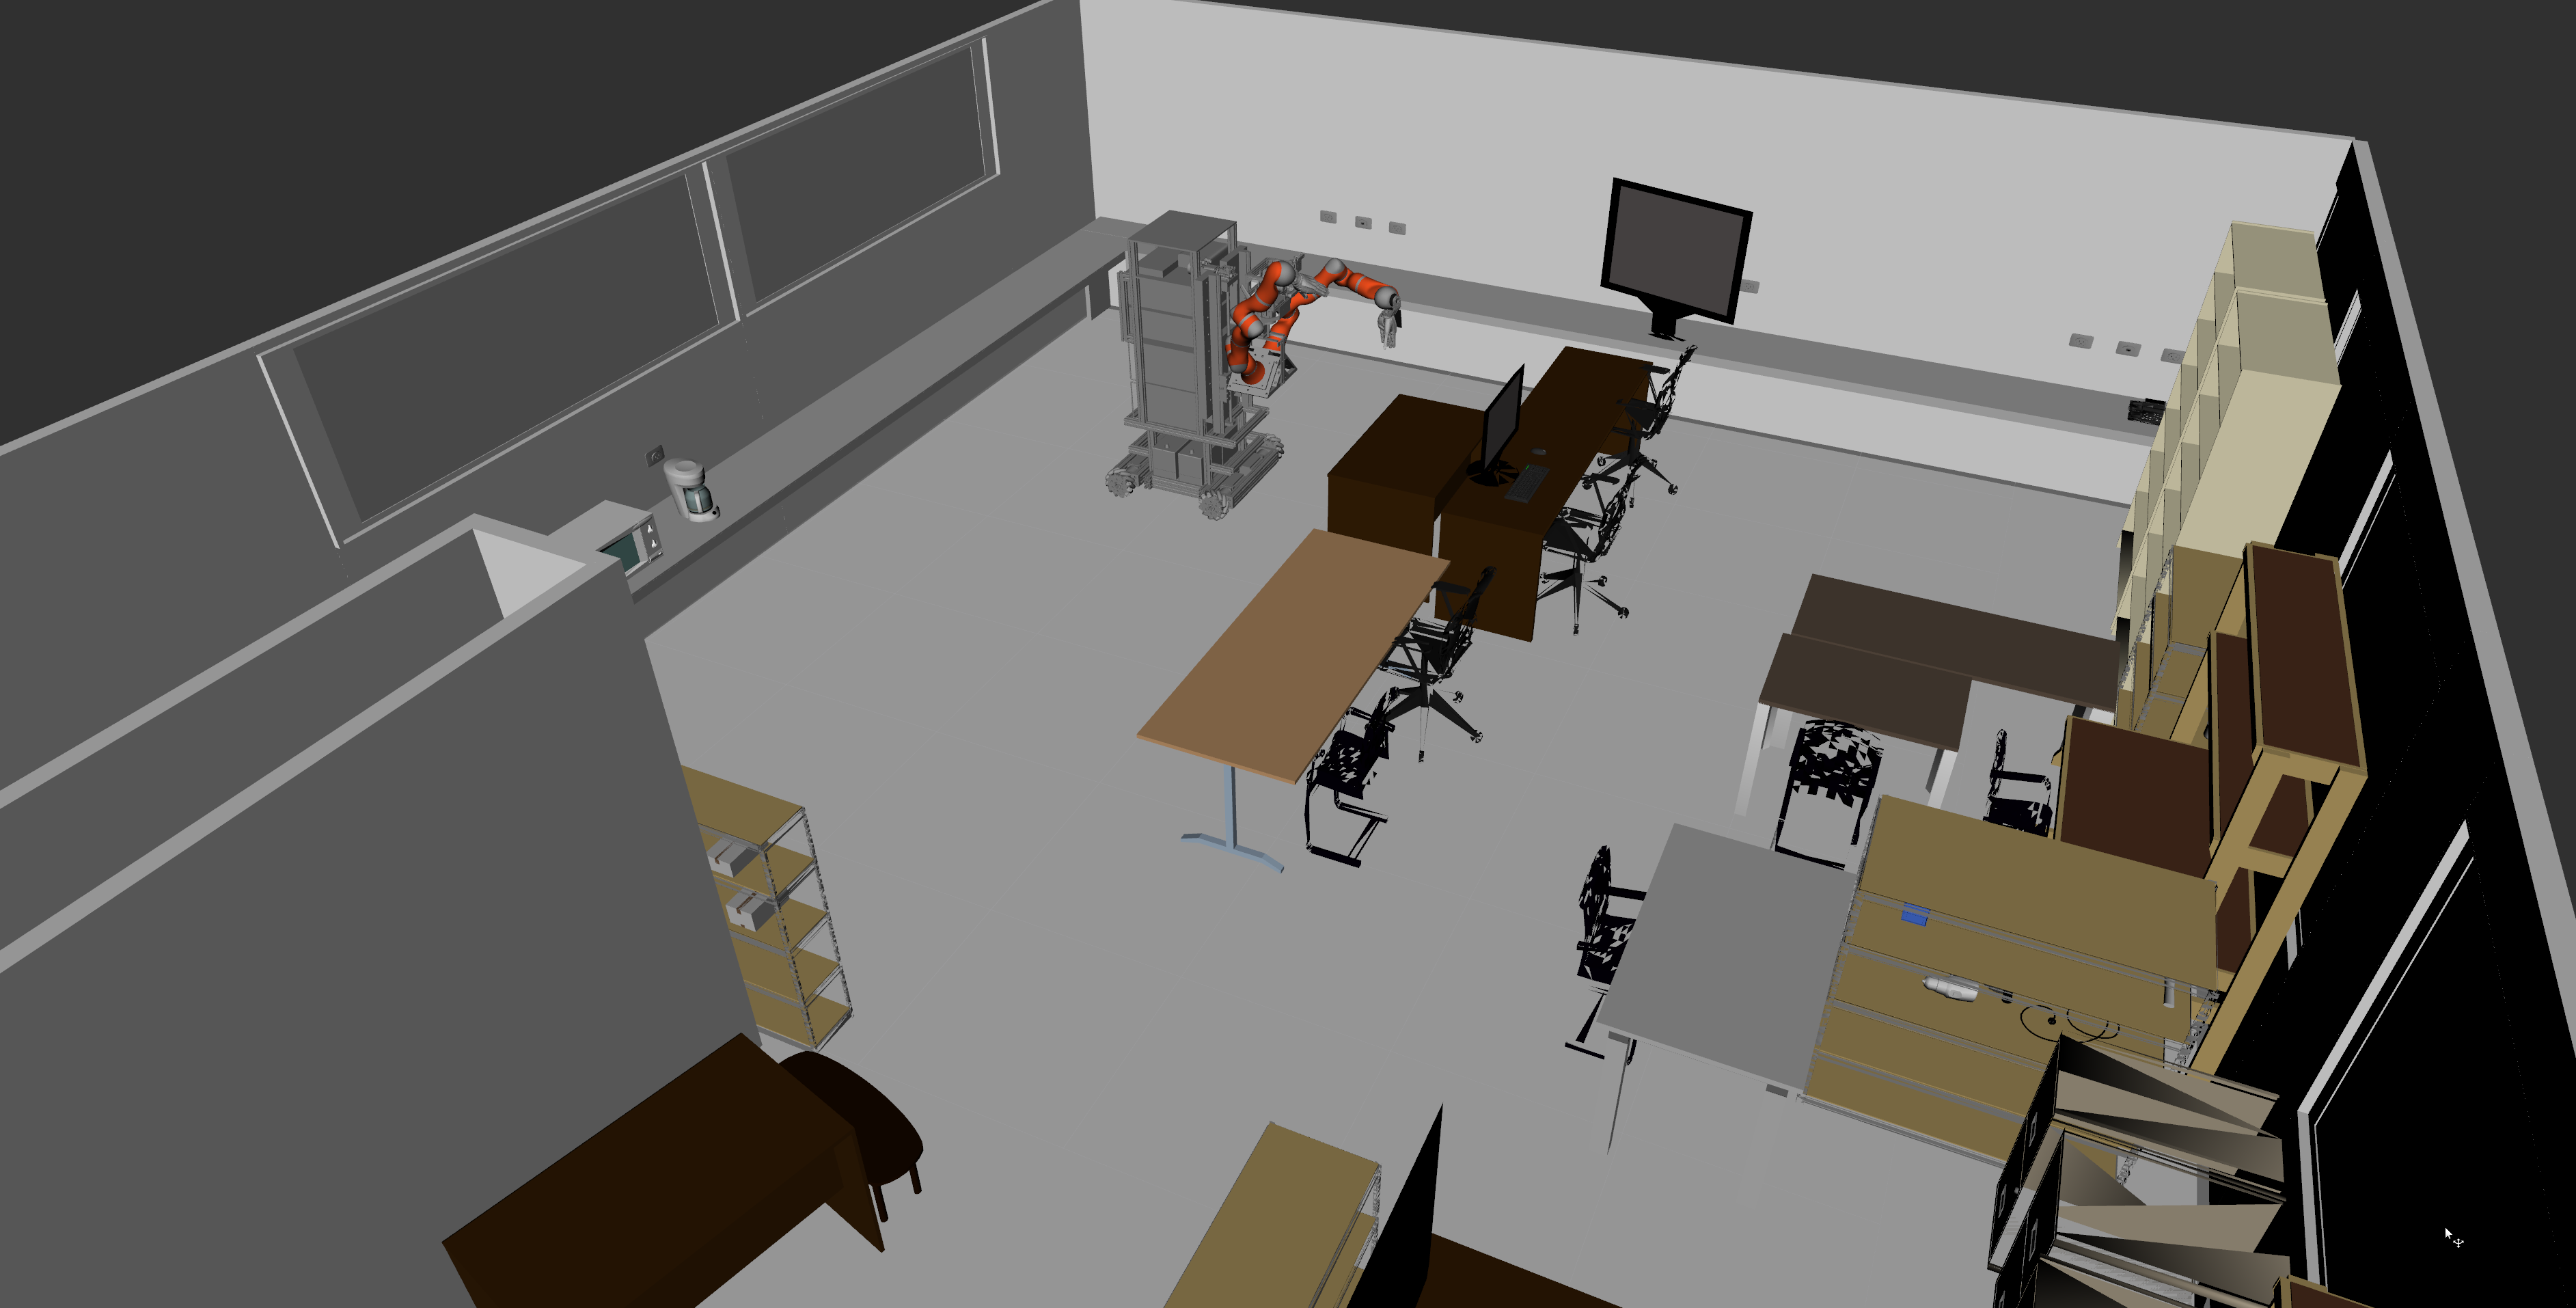
¶ Use the humanoid robot inside the virtual lab (optional)
Clone this repo and follow the instructions in the README file. You will be able to use the robot inside the virtual lab!
¶ Running the real Humanoid Robot:
In most cases you won't need to do much of the stuff in the tutorials because everything is already installed and working in the HUmanoid robot main servers (CRP0 and CRP1). Most of the time you just need to log into CRP1 through SSH and run the launchfiles that way.
The specific instructions for running the actual hardware are in the internal tutorials for members only here
Sometimes it is difficult to transfer images through ROS topics. So it is helpful to change some settings. THis usually happens because some IP fragments were lost or corrupted during transmission.
First it is helpful to change ipfrag_high_thresh, to increase the amount of memory dedicated to holding ip fragments before forming the entire message. Images are in general very big messages and if this threshold is exceeded, we will start to loose incomming messages.
sudo sysctl net.ipv4.ipfrag_high_thresh=268435456 # 256MB
Then it is also helpful to reduce the amount of time the kernell holds ip fragments before droping them. The default value is 30s, but we have found that 3s works just fine.
sudo sysctl net.ipv4.ipfrag_time=3
This changes are temporary, the next time you boot your PC they will be restored to the default values.