¶ Humanoid Robot
¶ Behavior and Relationships of the Humanoid Robot
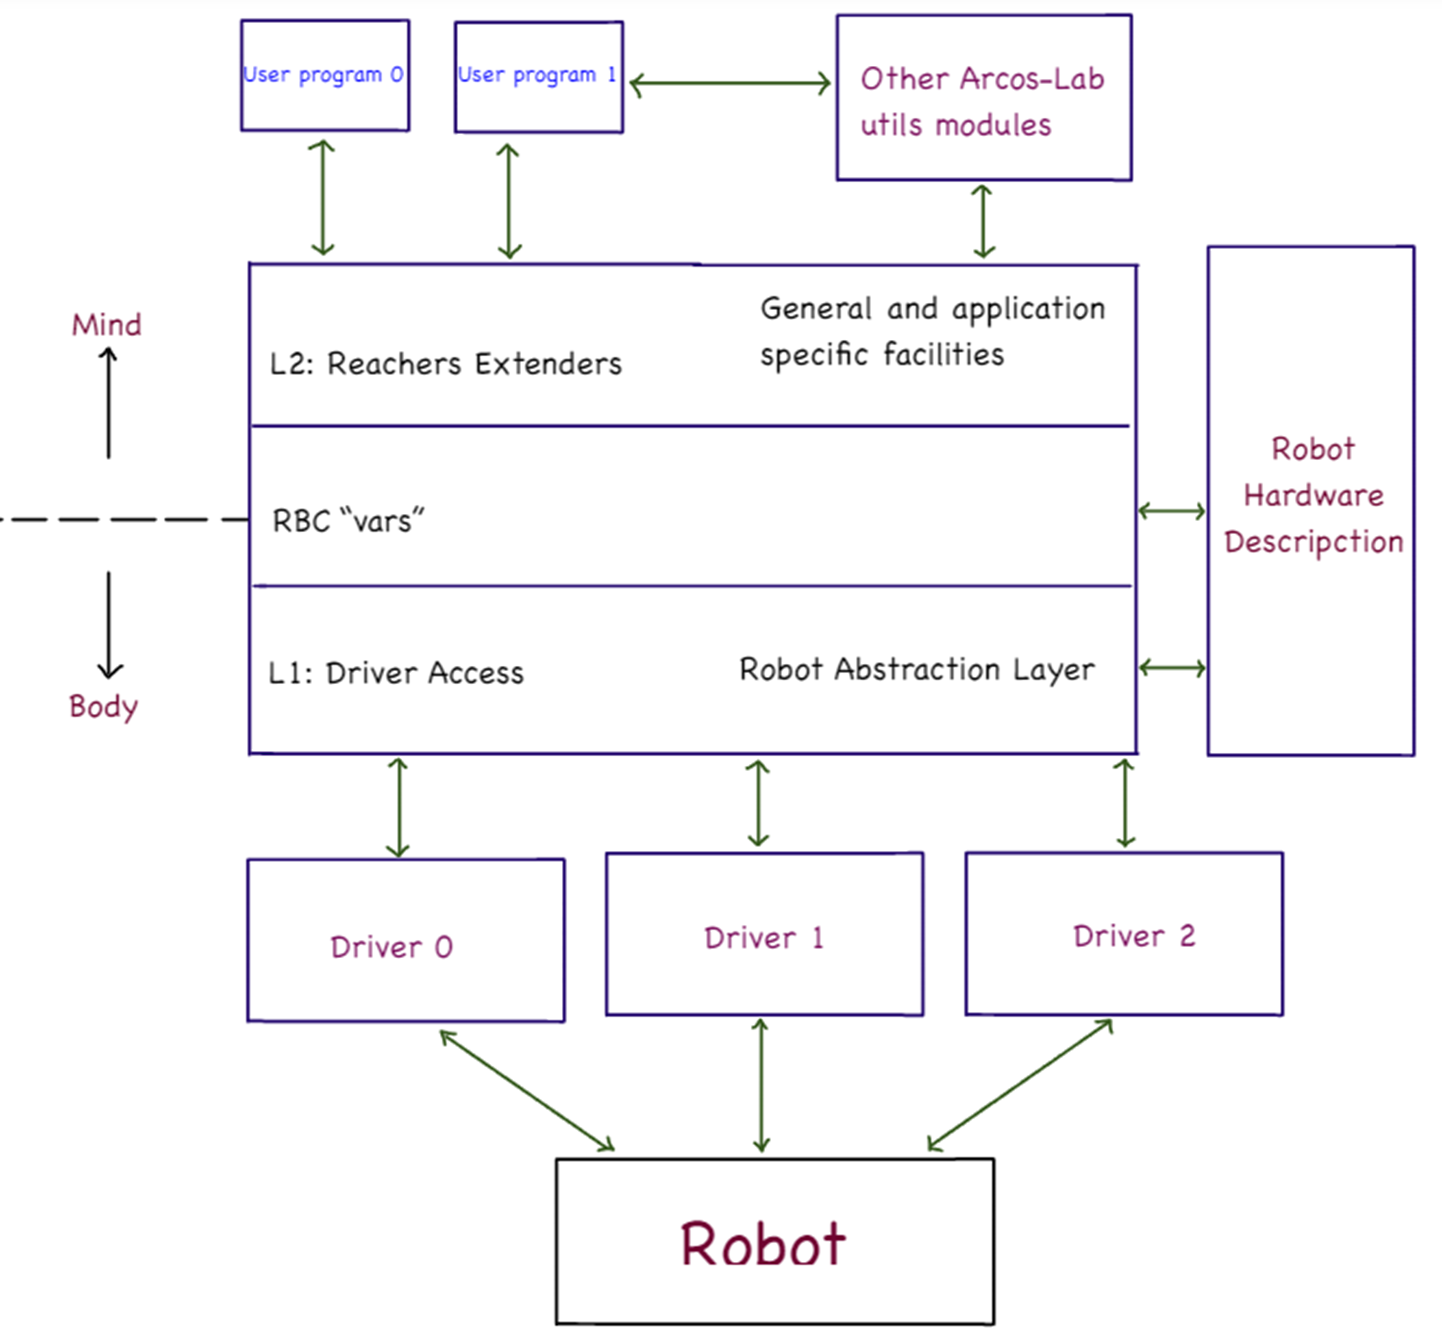
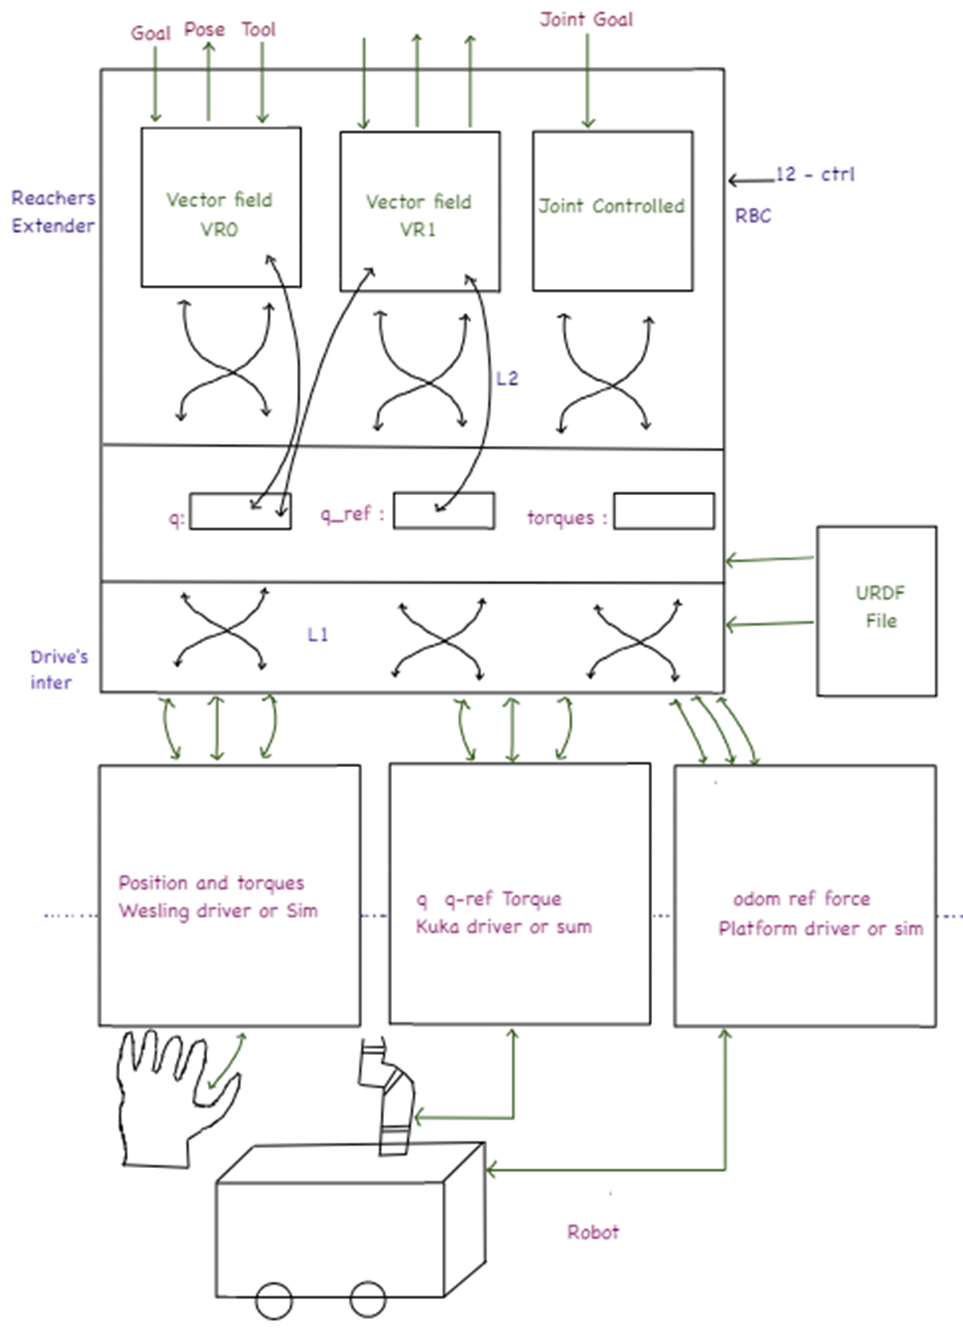
- Main source: ARCOS-Lab Cognitive Architecture
Conceptual diagram
Implementation example diagram
First the installation of ROS2
- Main source: Installation- Ubuntu (Debian)
¶ Environment
To simulate, it is crucial to first have ROS 2 properly installed and the environment prepared. If you do not have an environment set up, create a script named ros2_setup.sh. Copy and paste the following code into the script, and place the ros2_setup.sh script in the Home directory on your computer.
source /opt/ros/humble/setup.bash
source /usr/share/colcon_cd/function/colcon_cd.sh
export _colcon_cd_root=~/ros2_install
export ROS_DOMAIN_ID=40
source ~/wsr2/install/setup.bash
cd ~/wsr2
¶ Repositories
Request access to engineer Federico Ruiz Ugalde for the following repositories, then clone to the src directory inside wsr2.
Request access:
Once you have access, download the repositories and other requirements.
¶ Install Python Robot misc utils
sudo apt-get install python-is-python3 ipython3 python3-pip git ros-humble-xacro
- Install python_robot_misc_utils:
mkdir -p ~/local/src/repos/gitlab/arcoslab
cd ~/local/src/repos/gitlab/arcoslab
git clone https://gitlab.com/arcoslab/python_robot_misc_utils.git
cd python_robot_misc_utils
pip3 install -e .
Note: In case you have write permission to this repository use the following command for cloning instead of the previous one:
git clone git@gitlab.com:arcoslab/python_robot_misc_utils.git
- Install the generic multi joint impedance control virtual robot repo:
mkdir -p ~/wsr2/src
cd ~/wsr2/src
git clone git@gitlab.com:arcoslab/arcos-lab-cognitive-architecture/ros2-generic-multi-joint-impedance-control-virtual-robot.git
- Install the wessling_hand_driver repo first: (it is a dependency for the next one)
mkdir -p ~/wsr2/src
cd ~/wsr2/src
git clone https://gitlab.com/open-wessling-drivers/wessling_hand_driver.git
- Install RBC repository:
mkdir -p ~/wsr2/src
cd ~/wsr2/src
git clone git@gitlab.com:arcoslab/arcos-lab-cognitive-architecture/robot-body-coupler/robot-body-coupler.git
cd
source ros2_setup.sh
cd ~/wsr2
colcon build --packages-select rbc_msgs_srvs
cd
source ros2_setup.sh
cd ~/wsr2
colcon build
- Install the ARCOS-Lab humanoid robot startup repository:
mkdir -p ~/wsr2/src
cd ~/wsr2/src
git clone git@gitlab.com:arcoslab/arcos-lab-cognitive-architecture/arcos-lab-humanoid-startup.git
cd
source ros2_setup.sh
cd ~/wsr2
colcon build
- Install some rbc dependencies:
      sudo apt-get install python3-pykdl
      pip3 install quaternionic
Since we are trying to simulate the robot as near as possibly to the real one we developed separated simulation ROS2 modules for each robot hardware part:
¶ Install and Compile kuka LWR4Plus arms
mkdir -p ~/wsr2/src
cd ~/wsr2/src
git clone https://gitlab.com/arcoslab/robot-hardware-firmware/kuka-lwr4plus.git
cd
source ros2_setup.sh
cd ~/wsr2
colcon build
Note: In case you have write permission to this repository use the following command for cloning instead of the previous one:
git clone git@gitlab.com:arcoslab/robot-hardware-firmware/kuka-lwr4plus.git
¶ Install wessling_hand_driver
mkdir -p ~/wsr2/src
cd ~/wsr2/src
git clone https://gitlab.com/open-wessling-drivers/wessling_hand_driver.git
Note: In case you have write permission to this repository use the following command for cloning instead of the previous one:
git clone git@gitlab.com:open-wessling-drivers/wessling_hand_driver.git
¶ Install and Compile ARCOS-Lab mobile platform
mkdir -p ~/wsr2/src
cd ~/wsr2/src
git clone https://gitlab.com/arcoslab/robot-hardware-firmware/arcos-lab-mobile-platform.git
cd
source ros2_setup.sh
cd ~/wsr2
colcon build
Note: In case you have write permission to this repository use the following command for cloning instead of the previous one:
git clone git@gitlab.com:arcoslab/robot-hardware-firmware/arcos-lab-mobile-platform.git
¶ Open-CoRoCo python library and firmware
Downloading this repository may be necessary for two things:
- Installing the udev rules for detecting the open-coroco devices
- Installing the open-coroco pc client side library
- Reflashing the lastest open-coroco firmware version
- Download the repository:
mkdir -p ~/local/src/repos/gitlab/arcoslab/robot-hardware-firmware/open-coroco/
cd ~/local/src/repos/gitlab/arcoslab/robot-hardware-firmware/open-coroco/
git clone git@gitlab.com:arcoslab/robot-hardware-firmware/open-coroco/open-coroco-software.git
cd open-coroco-software
git checkout humanoid-platform
¶ Install the udev rule files:
cd utils
sudo cp 50-opencoroco.rules /etc/udev/rules.d/
sudo udevadm control --reload
cd ..
- You can now connect the open-coroco micro-USB cables
¶ Install the open-coroco driver library
cd python-opencoroco/
pip install -e .
Stop here for the simulating the robot
Continue if you want to reprogram the real open-coroco controllers (advanced) (only for real robot)
- Test each motor:
sudo apt-get install python3-serial
cd examples
./open-coroco-pc.py -d /dev/ttyOC0
cd ..
cd ..
¶ Flashing firmware
- Compile dependency libraries
sudo apt-get install gcc-arm-none-eabi
git submodule init
git submodule update
cd lib/libopencm3
make -j`nproc`
cd ../libopencm3-plus
make -j`nproc`
cd ../../
¶ Instructions (for simulation):
¶ Terminal 1
Step 1
source ros2_setup.sh
Step 2
colcon build
¶ Terminal 2
In a new console, Run RVIZ2
Step 1
cd
Step 2
source ros2_setup.sh
Step 3
ros2 run rviz2 rviz2
¶ Terminal 3
In another console run the robot body simulator:
Step 1
cd
Step 2
source ros2_setup.sh
Step 3
ros2 launch arcos-lab-humanoid-startup-sim arcos-lab-humanoid-startup-sim.launch.py
¶ Terminal 4
In another console run the robot platform simulator:
Step 1
cd
Step 2
source ros2_setup.sh
Step 3
ros2 launch arcos_lab_mobile_platform arcos_lab_mobile_platform_sim.launch.py
¶ Terminal 5
In another console run the RBC:
Step 1
cd
Step 2
source ros2_setup.sh
Step 3
ros2 launch rbc rbc.launch.py
Remember: Make sure you have your SSH keys configured in your GitLab account for authentication to work correctly.
It is important from time to time to apply the following command.
sudo apt upgrade
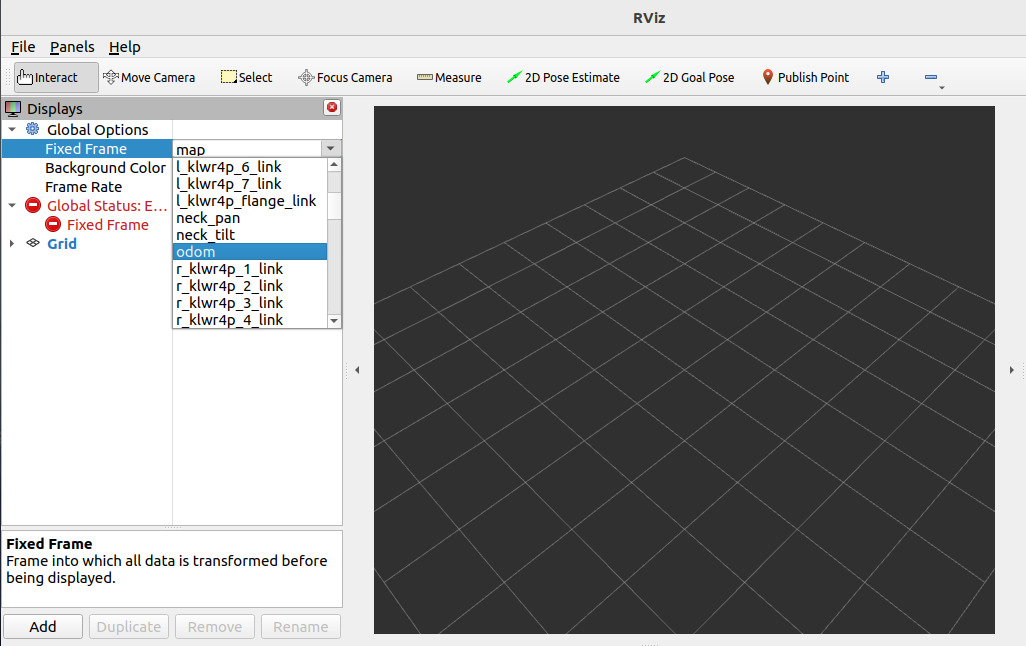
¶ Rviz Configuration
Step 1
Fixed Frame - odom
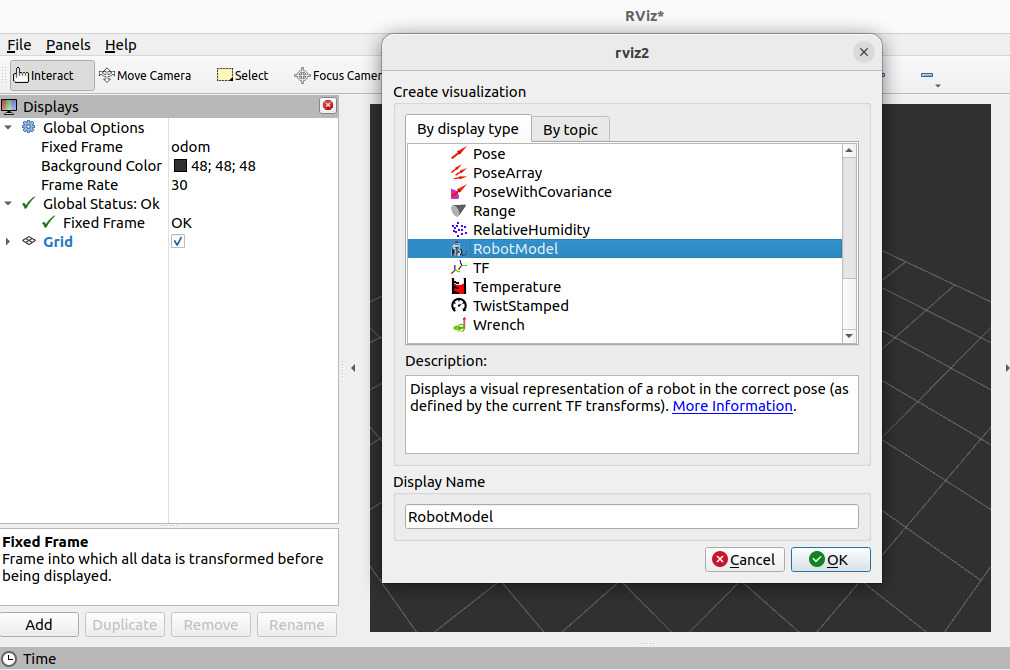
Step 2
Add - RobotModel - OK
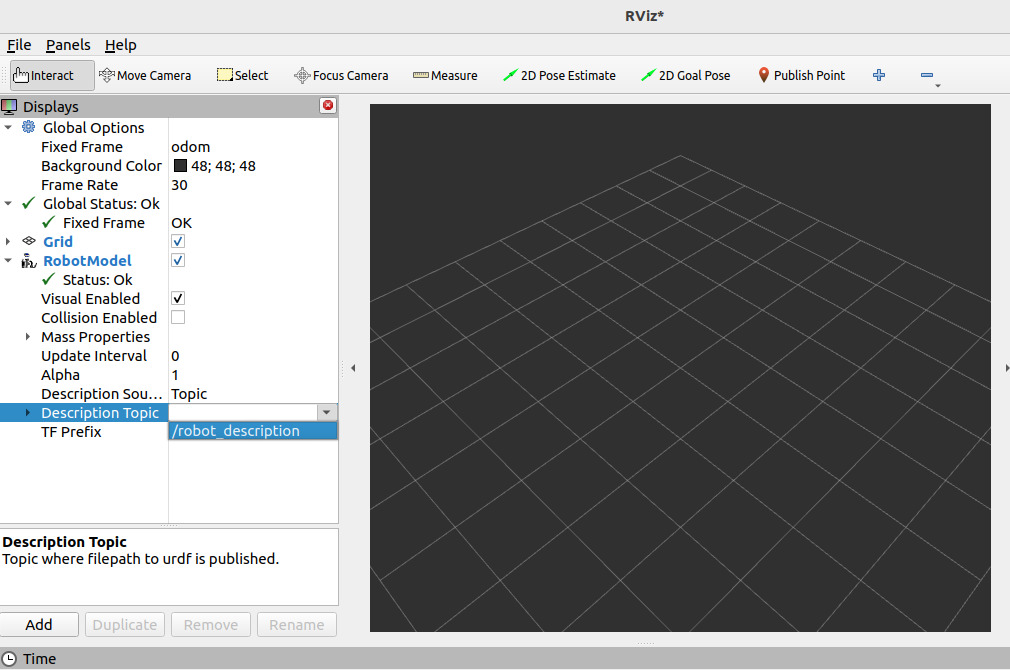
Step 3
Description Topic - /robot_description
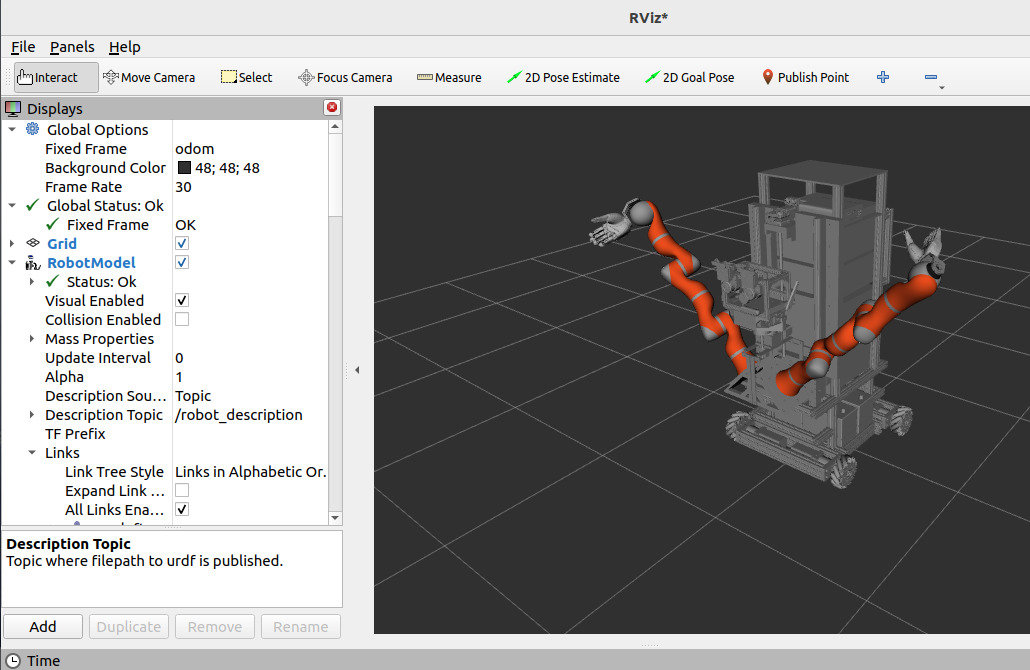
Step 4
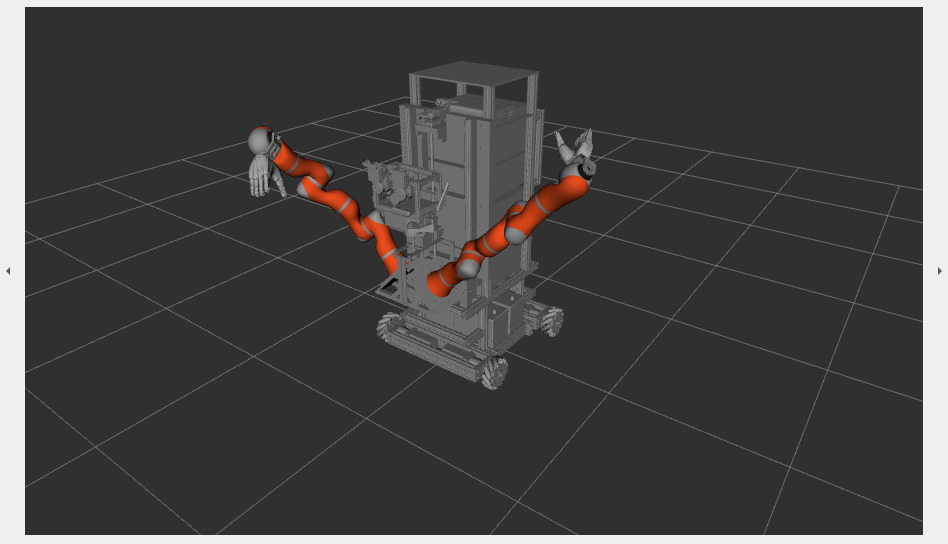
Ready-to-use RViz interface
¶ Using Robot Body Coupler Examples (ALL)
Remember to put the mobile platform on "Mode 0" (look on previous steps)
ros2 service call /arcoslab_platform_torso/control impedance_control_msgs/srv/Modes "enable: [True, True, True, True, True]
mode: 0"
There are two examples: rbc_joint_init and rbc_keyboard_ctrl
rbc_joint_init: takes one robot arm away from kinematic singularities. Or: starts the robot, using joint position control, on a know well-behaved starting pose. This is necessary for running the second program (or doing cartesian control)
rbc_keyboard_ctrl: the user can use various keyboard keys to control a robot end-effect, using cartesian position control, to a desired position. It is necessary to run rbc_joint_init at least once before starting to use this program.
- Clone the examples repository:
cd ~/wsr2/src/
git clone git@gitlab.com:arcoslab/arcos-lab-cognitive-architecture/robot-body-coupler/robot-body-coupler-client-examples.git
cd ~
¶ To use tests, first perform the previous steps again:
- Instructions (for simulation)
- Rviz Configuration
¶ Terminal A: Run rbc_joint_init at least once
In another console run the RBC.
Step 1
cd
Step 2
source ros2_setup.sh
Step 3
cd ~/wsr2/src/robot-body-coupler-client-examples/rbc_joint_init/rbc_joint_init/
./rbc_joint_init.py
The robot should "arc" the arm from up looking down. Wait until the program finishes.
The program should print "Goal reached!!! yei!"
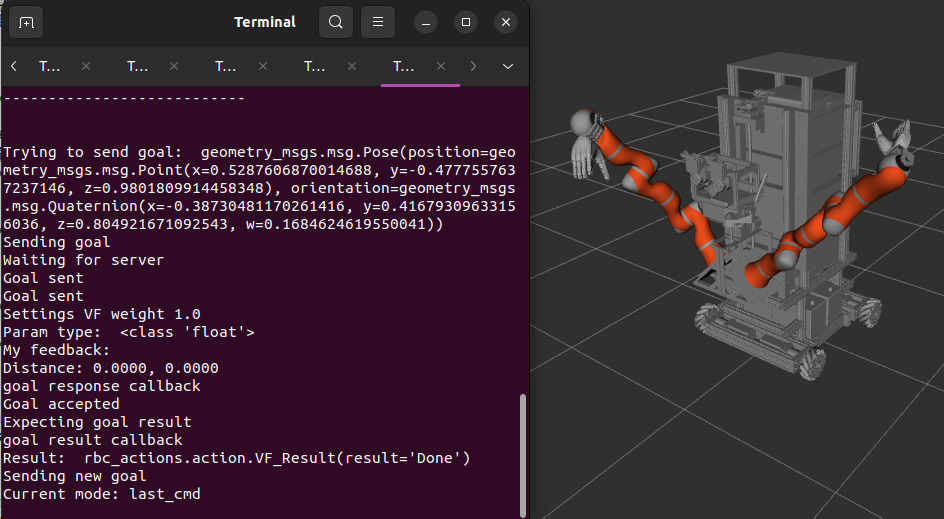
¶ Terminal B: Run rbc_keyboard_ctrl:
In another console run the RBC.
Step 1
cd
Step 2
source ros2_setup.sh
Step 3
cd ~/wsr2/src/robot-body-coupler-client-examples/rbc_keyboard_ctrl/rbc_keyboard_ctrl/
./rbc_keyboard_ctrl.py
Wait until the program stops printing (initialization)
- Press "p" once to change to "last_cmd" mode. This mode takes the previous commanded position (from the program) and adds a cartesian position delta according to your keyboard inputs
- Adjust the deltas with the keys "q" "w" (+ and - translation), "e" "r" (+ and - rotation). Select arount 0.05m of translation diff and 10 degrees of rotation diff.
- Using keys "a s d" (+ x,y,z translation) "z x c" (- x,y,z translation), and "h j k" (+ x,y,z rotation) "n m ," (- x,y,z rotation) to control the robot end-effect (defaults to the right arm wrist).
Step 4
rbc_keyboard_ctrl.py