¶ Mobile Robot Simulator
Coordinator: Daniel García Vaglio
This is a guide to learn how to use the mobile robot simulator.
¶ Installation
First install the humanoid robot simulator, follow the instructions TODO (old wiki)
Now we can clone the repository:
  cd ~/local/src/
  git clone http://github...
Now install the simulator in your local directory
  cd ~/local/src/mobile_robot_simulator/
  make xstow_install
¶ Testing
The simulator is now installed, now is time to verify everything is working properly.
In one console execute the yarp server.
Open another console and execute:
  cd ~/local/src/
  pyrovito
Open another console and execute:
  cd ~/local/src/
  core.py
Open another console and execute:
  cd ~/local/src/
  goal_obstacle.py
Now you should have something similar to this in you screen:
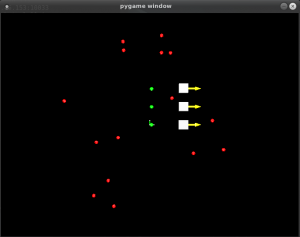
The white boxes are the robots, the yellow arrows indicate the front of the robot. The green points are the goals of every robot, and the red points are the obstacles. When you allow movement to start, the robot will try to go from their initial position to the goal without touching the obstacles or the other robots.
In the console where you executed goal_obstacle press the "r" key. This will locate the obstacles in a random position. Now use the arrow keys to move the goals. Use the "o" key to select wich goal is moving. Once the goals are in the desired position press the "f" key, so obstacles will start a random movement.
Go to the console where you executed core, and now press the "m" key. This will start robot movement.
¶ Explanation
This is a very quick explanation of how this simulator works, so that is easier to modify the existing code.
There are three modules, one is the goals and obstacles module, the other one is the robot module, and the third one is the visualization module. For the visualization module we are using another project (pyrovito), so it is not going to be explained.
¶ Goal and obstacle module
This module is in charge of determining where are the obstacles and where are the goals. At this moment, this module is implemented in goal_obstacle script. where the obstacles have random position and the goals are moved by the user.
This module can be implemented in a different way, for example, a real perception system that determines the position of real obstacles and goals in a room and sends this data to the simulator.
This module communicates with the rest of the simulator using yarp. It opens a port for every goal, and one port for all the obstacles.
¶ Robot module
This is the main part of the simulator, it is implemented in core. This module receives the position of every goal and obstacle. By knowing the position of every robot, it computes the velocity that every robot requires (required velocity). With the required velocity, one use this as an input for the robot model implementation and computes the real current velocity (robot velocity). This module keeps integrating the real velocity in every control cycle, so that one can have the pose of every robot. Once all this is done, it sends the information to pyrovito for visualization.
¶ Vectorfield
In order to be able to compute the instant velocity that every robot requires, we are using a vector field implementation (implemented in vectorfield.points). Here one calculates a "force field" at the robot position depending on the position of the goal and the obstacles.
Every robot is affected by only one goal, its force is a constant attractive force that can be changed by changing one variable value: goal_constant. So the robot feels a attractive force of magnitud goal_constant towards the goal in every point in space. Then, for the obstacles, there is a repelent force. This is computed using the formula for electrostatic repulsion. So this force is stronger as the robot moves closer to an obstacle. The effect of every obstacle is added. One can change how strong is the force of all obstacles, by changing one variable value: obstacle_constant. There is a third force, this one does not depend on the position of goals or obstacles, this is a damping force. This force is used to limit the robot velocity. The damp_constant determines how strong is this force. This force is computed as simple fluid friction.
By adding the effect of all this forces (goal force, obstacles forces, and damping force), the total acceleration is computed. This is added to the current robot velocity, to obtain the new robot velocity. This velocity is used as the required velocity in core.
¶ Robot class
In order to have a very general simulator, there are 5 types of robots that can be used (only the differential robot has been implemented). If there is more than one robot, core can create them by using different types. This can be configured by changing the values in one list: robot_type_list.
Core will create an instance of any of those classes according to what robot_type_list has stored. Every class has a method called central_velocity, this method takes as inputs, a velocity vector, and a orientation value, gives as output a velocity vector. This method is used to give velocity commands to the robot. Receives the current orientation and the required velocity at its center, and returns the velocity at its center. In the case of the differential robot, the decentralized point algorithm is used.
The output of this method is used as the real robot velocity in core.
¶ What you can do
-
We are trying to create a very good and customizable mobile robot simulator.
-
We are adding a module to record simulation data