¶ Hand-Eye calibration aka: extrinsic camera parameters
¶ Installation process
¶ Get the realsense working
Configure your computer to be able to use the realsense in ROS2. Follow the instructions of the Oficial Intel repo for this.
¶ Target detection
Once the realsense is up and running, we can use it to detect targets. This phase is important because we will use the target detection to calculate the transform between the camera and the arm.
cd ~/wsr2/src
git clone git@gitlab.com:arcoslab/arcos-lab-cognitive-architecture/ros2-target-detection.git
Follow the instructions in the README of the repository you just cloned to be able to install and use it.
In out particular case we use a 8x6 chessboard with square size 0.04.
¶ TF service
cd ~/wsr2/src
git clone git@gitlab.com:arcoslab/arcos-lab-cognitive-architecture/humanoid_utils/ros2-handeye-tf-service.git
cd ~/wsr2
colcon build
¶ Python utils
cd ~/wsr2/src
git@gitlab.com:arcoslab/arcos-lab-cognitive-architecture/humanoid_utils/ros2-handeye-python-utils.git
cd ~/wsr2
colcon build
¶ Dashboard for calibration
cd ~/wsr2/src
git clone git@gitlab.com:arcoslab/arcos-lab-cognitive-architecture/humanoid_utils/ros2-handeye-dashboard.git
cd ~/wsr2
colcon build
¶ Calibration
¶ Set up
The launch files have been divided between hardware and the dashboard. The hardware lauch file should run in the humanoid robot server, as this is the computer with direct access to the hardware. The dashboard should run in your computer, because it uses a GUI (so it won't work on the server).
¶ Server side
On the server side launch L1, to get access to the hardware. Make sure that a camera (realsense), and the kuka arm with the calibration board are being executed using the real hardware (not being simulated). To make sure which parts of the robot are being simulated, and which ones are running for real you can check humanoid_launch_conf.yaml located in demo's home.
You should activate at least:
- The camera you will use for calibration (realsense, high resolution HikCamera, etc...)
- The arm you are going to use for calibration (left, or right)
- The neck, to position the camera correctly with respect to the shoulder
ros2 launch arcos_lab_humanoid_startup arcos-lab-humanoid-l1.launch.py
Launch L2 to get RBC running and enable all the different hardware systems that you launched previously
ros2 launch arcos_lab_humanoid_startup arcos-lab-humanoid-l2.launch.py
Now launch the server side stuff that is specific of hand-eye calibration
ros2 launch handeye_dashboard handeye_server_side.launch.py
¶ Host side
Now on your computer launch rviz to get access to all the info that is going to be used:
ros2 launch arcos_lab_humanoid_startup rviz_humanoid.launch.py
And launch the dashboard for calibration:
ros2 launch handeye_dashboard handeye_dashboard.launch.py
In your computer move the robot with:
ros2 run kuka_lwr4plus_tester lwr4plus_keyboard --ros-args -p side:=right -r __ns:=/humanoid
Launch the gui. On your computer run this launch file, this will start
- Rviz with a specific configuration
- The robot description and robot state publisher
- The handeye tf service
- The QT GUI for handeye calibration
ros2 launch handeye_dashboard handeye_dashboard.launch.py
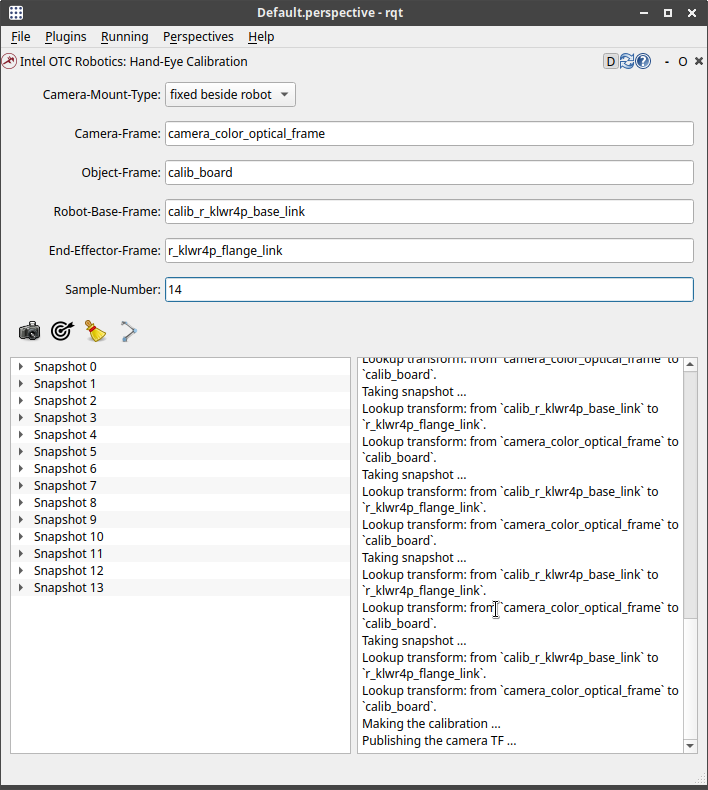
Select the camera mount type fixe beside robot or attached on robot.
In the GUI select the frame for calibration
- Camera-Frame:
camera_d435_link - Object-Frame:
calib_board - Robot-Base-Frame:
calib_l_klwr4p_base_link - End-Effector-Frame:
calib_tag_holder
¶ Process
Now you are ready to start the process.
- Step 1: Press the first button (The camera logo) to take a snapshot. This will save in memory the transform from the
Camera-FrametoObject-Frameand the transform fromRobot-Base-FrametoEnd-Effector-Frame. - Step 2: Move the robot to a new position, making sure that the tag is still in frame
- Step 3: Repeat steps 1 and 2 enough times. Enough is an empiric value of around 300 Snapshots. Depending on your particular configuration could be more or less.
- Step 4: Press the second button to publish some camera data
- Step 5: Press the fourth button to calculate the transform between the base of the robot and the camera. The result will be in
/tmp/camera-robot.txt
¶ (WIP) more automation
The process of handeye calibration is a very tedious one. It would be better if we could make this in a more automatic way. The first part is to program a lot of different positions to the robotic arm. To teach these positions, first launch the fri node
ros2 launch handeye_dashboard handeye_server_side.launch.py
Then enable movement
ros2 service call /humanoid/kuka_lwr4plus_right/control impedance_control_msgs/srv/Modes "enable: [True, True, True, True, True, True, True]
mode: 0"
Execute the following program to teach positions. The arm will enter into a mode similar to gravity compensation and will allow you to move it as you want. Try not to get the robot into any singularities or joint limits. You can verify with the realsense if the calibration tag stays inside focus.
While the program is running press s to record a new position and q to store all positions into a file.
ros2 run kuka_lwr4plus_tester lwr4plus_pos_recorder --ros-args -p side:=right -p file_name:=positions.json -r __ns:=/humanoid
It is helpful to start from a "nice" pose. You can use the following for the left arm: [-1.716, -1.383, -0.003, 1.410, -2.061, 0.224, 0.633]
It is helpful to start from a "nice" pose. You can use the follwoing for the neck: [0.0, 0.5]
Once you have all the positions in a file you can use the following program to execute them in sequence. The parameter wait_keyboard will configure the node to wait for your key strokes before executing the next position. If set to false, it will esecute them one after the other.
ros2 run kuka_lwr4plus_tester lwr4plus_exec --ros-args -p side:=right -p file_name:=positions.json -p wait_keyboard:=false -r __ns:=/humanoid
¶ Results
From link arm_left_base to link camera_d435_link. Using as end-effector l_klwr4p_flange_link.
camera-robot pose:
  Translation: [0.2334983192080995, -0.5325152613379277, 0.4495693941974191]
  Rotation: in Quaternion [0.7626025057779247, 0.2984246087412599, 0.5268736333960193, 0.22756173999803472]
From link calib_l_klwr4p_base_link to link camera_d435_link. Using end-effector calibration_tag.
camera-robot pose:
  Translation: [-0.4454554974659277, 0.08732046021295065, 0.5340148395528967]
  Rotation: in Quaternion [0.6339891762310158, 0.5585232545565054, 0.07534984407904399, -0.529558211662127]